Showing posts with label Birthdays. Show all posts

Sunday, October 25, 2015

Creating Your Own Mini Economy

Do you ever have the feeling that money is leaking out of your home left ,  right and centre ?  Do you feel that your shopping habits are making everyone else rich and your purse a little poorer ?  Do you cringe when large companies post their yearly profit reports ?

If you are answering yes to any of these questions,  I have a solution that will make you feel a little better about your money situation.

Create your own mini economy at home.


Here's how it works.

Buying presents for family and friends all year round can cost a fortune.  If you're like me you have a present / gift  budget.  I always like to beat the present budget and have money left over at the end of the year to buy treats.  Yes I can buy presents on sale and that will save me money.  If I go one step further I can keep most of my present fund within my home instead spending all that money at the shops.

Making presents is a great way to save money and results in a lovely present to give for just a couple of  dollars.  Because I have a well stocked pantry, when I make biscuits for presents,  I just use what I have on hand.  I estimate that  a jar of biscuits costs me $2 for the jar and less than $1 for the biscuits.  Ribbons and gift tags cost zero because I use free supplies to make my own.   The present looks like it's worth much more,  maybe even $10.  I take $10 out of my present / gift budget and put it into my food / grocery budget ( envelope ) to pay for the ingredients.    By doing this,  my food budget has made a profit of $7.

The savings doesn't stop there.  I might have budgeted $15 for a present for a friend.  By only taking $10 out of the present budget to pay the food budget,  I've saved $5 on the present budget.


Here's another example.

I made a couple of tote bags late last year to be given as presents.  The material cost $4 in total for the two bags and I paid for it out of my clothing budget.  That was the envelope I had with me when I was in Spotlight looking around.  Tote bags cost about $10 in the stores if paying retail  Using this valuation,  I took $20 (  $10 for each bag ) out of the present budget and put it into my clothing envelope to reimburse for the material costs.  My clothing envelope has just made a profit of $16. I usually budget $15 for each present so if I chose to give the tote bags on their own,   I've just saved my present budget $5 on each present.   Everyone wins.  I gave one of these tote bags to Darren's sister for her birthday recently and she loves it.  She's already used it too.


Here's one final example to seal the deal -

I love making jam.  I also love eating it because it tastes so much better than anything I can buy.  I also know exactly what's in it.    If I make raspberry jam using our own home grown berries and lemon juice from our own lemons,  the only cost is sugar.  I have a few friends and family members saving jars for me,  so no cost there.  When I make a batch of raspberry jam,  I might use one kilo of sugar ( for example ) which cost less than $1  That batch might yield 10 jars of delicious jam.   If I put a retail price of $3 on each jar ( they are small / medium jars ) then the total retail value is $30,  yet they only cost me $1 to make.  I could be technical and add in the cost of the gas to cook the jam.  I give lots of jars of jam as presents so each time I give one,  I take $3 of of the present budget and  put it into my food budget


You could use this idea for all sorts of presents.  If you take cuttings of plants or grow seedlings from seeds,  they make wonderful presents.  Put a retail value on them and boost your gardening budget as well as saving a little money on presents.

Make some cards and give them in packs of ten wrapped on cellophane with a ribbon.  Put a retail value on it and boost your craft budget.

Make soap,  wrap it in tissue paper or cellophane with a ribbon.  Put a retail value on it and boost your toiletry / make up budget.  Or boost your food budget (wherever you took the money from to buy the ingredients ).

Yes you are still spending money at the shops.  You are still helping businesses but you are not giving all of your hard earned money to make the rich richer.

What gifts do you like to make ?

Sunday, September 20, 2015

Biscuits For Presents

I just love homemade biscuits.  They are delicious,  decadent and absolutely yummy with a cup of tea.  More importantly,  they are very frugal to make.

Whenever I'm stuck for a present,  homemade baking comes to the rescue.  My favourite biscuits to give are Cranberry Hootycreek biscuits, Anzac biscuits and Peanut Butter Choc Chip Biscuits.

For hungry teenage boys I've made giant Peanut Butter Choc Chip Biscuits.  I place a large amount of dough on a lined baking tray,  flatten out with the palm of my hand then neaten the edges with my fingers to give a lovely round shape.  They do need a few extra minutes for baking.  I place 2 or 3 in a large cellophane bag tied with a tartan ribbon  Placed in a gift bag with a can of Lynx deodorant,  it makes a great male birthday present. for about $5  Let me tell you,  birthday boys have gratefully received these giant biscuits.  One of Jessica's friends bought one to school in his lunchbox and woofed it down at recess.  His friends were drooling.

Sometimes when I get a present out to wrap,  it looks like it needs something extra.  That's when I whip out a log of biscuit dough from the freezer and do some baking.  Neatly placing 8 - 10 medium sized biscuits in a large cellophane bag and tying a bow with ribbon,  lace or netting  achieves an elegant present worth $10 - $15 retail.  Realistically it costs less than $1 to make.

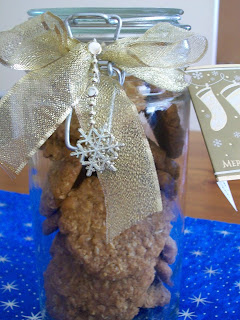
For a family present or Kris Kringle,  I buy glass jars from the $2 shop and fill with homemade biscuits.  I print out the recipe and place it in an envelope and tie it to the lid.  You can add a small decoration or garland to the bow to add extra style.    

Here are some photos of biscuit presents I've made -

A male Christmas present.


.A jar of biscuits from the Christmas story I filmed last year.  Total cost of this present was about $3 - $3.50


Presents tied with homemade gift tags and ribbon made from netting -


Here is a link to a blog post I wrote on making gift tags.
  

Sunday, June 28, 2015

Apple Rose Pastries

I first saw a tutorial for Apple Rose Pastries on facebook a few weeks ago.  They are easy,  tasty and very impressive looking.  After looking at the tutorial a few times I thought I'd give it a go.  I've made a few changes as I came across some problems when making them.  Here's my version of a delightful dessert -


2 sheets of puff pastry
3 medium red apples
1 1/2 tablespoons of jam - any flavour,  store bought or homemade
1 cup of boiling water
flour for the bench
juice of half a lemon
cinnamon -optional
icing sugar - optional

Cut the apples in half and neatly cut out the core.
Thinly slice the apple halves discarding the small end pieces


Place and spread out the apple slices in a large microwavable bowl
Pour the boiling water over the apple and add the lemon juice.  Stir slightly.
Cover the bowl with cling wrap and punch a couple of holes in it.
Microwave on high for 3 minutes or until the apple is cooked and soft ( not mushy )
Drain the water and let the apple cool.


Defrost the pastry until it's almost room temperature. 
Lightly flour your kitchen bench and roll the pastry out with a rolling pin until it's longer by about 20%.  Make sure your rolling pin is lightly floured too.
Cut the pastry sheet into 5 long strips.


Warm the jam in the microwave until it's easy to spread
Spread the jam over the top half of each pastry strip


Layer the apple pieces over the jam. Make sure the apple overlaps each other.


Sprinkle with cinnamon and fold the bottom half of the pastry up towards the top.


Starting at one end,  roll the pastry up taking care that the apple doesn't fall out.
Pinch the pastry end to the rose.
Place each rose in a lightly greased muffin tin


Cook at 180 degrees Celsius for 40 minutes
Sprinkle with icing sugar and serve with cream or icecream

Makes 10 apple roses.


NOTES -

*  The original tutorial said to cut the pastry in 6 strips.  I found the pastry too firm to roll it out this thin.  I think the pastry in the tutorial was American and might be more flexible.

*  The apple slices must be cool or it will soften the pastry too much making it hard to work with

*  Make sure the jam is just warm or it will soften the pastry.

*  The original recipe used cold water to cook the apples.  This takes too long to heat up in the microwave

*  The apple roses can be made and cooked ahead of time.  I found them easy to reheat in the oven on a baking tray.

Monday, May 11, 2015

Sausage Rolls

These sausage rolls have become a party favourite in the Gower house.  They are full of flavour and very tasty.  Once you've tried homemade sausage rolls you'll never want to eat store bought again.

4 sheets of Puff Pastry defrosted.
I egg beaten

To a large bowl add - 


500 grams of sausage mince, 
good squirt of tomato sauce,
Salt, pepper, chives or parsley,
finely chopped onion ( or dried ),
Garlic ( I use dried )
Half a cup of seasoned  bread crumb
.
Mix all ingredients well by hand or with an electric mixer

Lightly spray baking trays with cooking spray

On a floured surface cut 1 pastry sheet in half ( thirds if you want tiny bite sized ).
Spoon mixture along each pastry half, - not too much.
Brush edge closest to you with a beaten egg.
Roll pastry over towards you

Brush the top of the pastry with the beaten egg.
Cut to desired size.
Cook in oven on about 200 degrees Celsius for 20 - 30 mins until golden brown


NOTES - 

*  Grated carrot and zucchini can be added to the sausage mince.

*  Sausage rolls can be frozen.

Monday, April 6, 2015

Card Making On A Budget

Recently I've taken up card making in a big way.  As you know I'm on a tight budget and cannot afford all the fancy gizmos and gadgets that are used to make beautiful cards.  The stamps,  card stock,  cut outs,  hole punches,  tape,  water pens,  ink pads etc etc etc and the list goes on.  Sure,  I'd love to buy a few items some time in the future if the price is right.  But for now I've made do with what I had on hand and only purchased the blank cards and envelopes.

My first attempt at card making.

I'm no expert by any stretch of the imagination and wouldn't dream of showing you how to make amazing cards.  I just thought it would be helpful to let you know how I've made my cards for under 50 cents each.

Firstly I bought some blank cards from the $2 shop.  Other cheap shops sell them but you'll be paying $2.50 plus per pack.  Remember,  I'm doing this to save money not to spend any more than I need to.  Check the pack to see how many cards are in there and that envelopes are included.  Some will have 6 or 8 cards.  I always choose the 8 card packs.

Some of my card supplies.

Make sure you pick colors you can use.  No point in picking brown cards if no one likes the color.  I choose pale pink,  pale green,  white and purple to start with.  Since then I've added red,  cream and dark pink to the collection. Some $2 shops sell packets of A4 colored card.  I found some in a beautiful pearly purple color and there were 6 sheets in there.  I cut each sheet in half getting 12 cards for $2.  There were no envelopes with it but I can make these easily with plain paper I have on hand.  Spotlight also sells packets of A4 card 20 per pack for just under $5.  Cut each one in half to get 40 cards.


I already had some stamps and two ink pads ( purple and pink )  bought in a discount store many years ago.  If you have children,  dig through their craft boxes to see if they have stamps and ink pads.  If not,  you only need to purchase a few basic ones to get started.   E bay might be an option for you.  Here are the ones I have.

My old ink pads that are over 10 years old.


Many uses for these few stamps.

A Spotlight clearance bargain for $6

I purchased the paper doilies from Kmart but $2 shops also sell packets of them.  If you buy the smallest size available you'll get many more in the pack.

Doilies are punch outs.

Other items that you'll have on hand are -

*  Wrapping paper.  Look for ones that have pictures to cut out.  Also paper with writing on like happy birthday are great too.  You can cut out the writing to stick on the cards..  Have a dig in your wrapping paper box.  I did and was amazed at what I could use. Make sure you save any usable wrapping paper from birthday parties.  Even scraps can be used as a border strip down the side of the card.

Paper from my present box.

*  Buttons,  lace,  ribbon,   beads,  sequins,  stickers and old birthday cards are all handy to use.  Start saving anything that's useful.  Even scraps.  Save the ribbon from toiletry packs,  presents and clothing,   Op shops are worth checking too.  Christmas garlands come on clearance on Boxing Day.

Christmas garlands bought on clearance.

Embellishments picked up over the years.

Recycled and bought ribbon.

*  Glue sticks,  PVA glue and a hot glue guns are all useful tools.  I always have a heap of glue sticks for school use.  These are great for sticking paper bits onto the card.  PVA is for sticking card cut outs onto to card if you think the glue stick isn't strong enough.  I use the hot glue gun for embellishments like buttons and material flowers.

Gluing and cutting tools.

*   Magazines.  Do you have any gardening magazines or homemaking ones ?  You could find plenty to cut out from them. . 


HANDY HINTS -

*  Before you start sticking things onto your card,  place all the bits onto the card to see if it looks right.  Then go for it.

*  Clean your stamps in between uses.  Some people use baby wipes.  I just use water and a tissue to blot the water away.

*  If you make a card you really like,  get a production line going and make a few.  Maybe in different colors.  This will save you lots of time.

*  Keep all your card making supplies in a box.  Having it all in one place makes life easier.  If you're in the mood for card making you just need to grab your box.  Easy  !!!


Are you inspired to have a go at card making ? 

Wednesday, October 1, 2014

A Birthday Thankyou

Thankyou to everyone who sent birthday wishes via email,  facebook,  texts and my blog My Abundant Life.  Your thoughts and wishes were greatly appreciated and helped to make my day very special.

Megan made breakfast in bed for me that rivalled 5 star room service.  The girls and I spent the day doing what we like doing best - SHOPPING although I didn't do the buying ,  the girls did.  We went to my favourite op shop Savers which is almost on my doorstep.  I just love looking especially in the kitchen department which is like a trip down memory lane. I always have a giggle at the kitchen trends of the 60's,  70's,  80's and 90's.

For dinner we had homemade lasagne which was from the freezer so no one had to cook.  Megan and Jessica made profiteroles using a White Wings mix we found in the clearance trolley at NQR about 2 months ago.  Oh so yummy and there are leftovers for tonight.  A very frugal but delicious dinner enjoyed by all - especially the birthday girl.

Thankyou again and here are a couple of birthday photos -

Breakfast

My birthday dessert

Profiteroles